Probably Polka Dots Entertaining | Probably Polka Dots
Showing posts with label Entertaining. Show all posts

26 January 2018

Healthy Apple "Doughnuts" for Valentine's Day Snacking


As I've mentioned, my house has been on somewhat of a health kick. Or at least our version of a health kick. We haven't been indulging in things like donuts, cupcakes, and cookies in an effort to embrace a healthier January. The plan is to carry it right on into February, too!

However, as we all know, the hard part of February is all of the fun things that happen during that month. We basically kick it off with "the big game" which is followed by Mardi Gras which is promptly followed by Valentine's Day. In an effort not to totally go off the bandwagon, I've been thinking creatively about chocolate-ridden holidays like Valentine's Day, and today, I've got a fun alternative perfect for little kids and kids at heart: healthy apple doughnuts. 


Apples are a staple around here. I keep them for on the go snacking, easy baking, and fun recipes like this one. I love this concept because it's perfect for even the smallest kiddos to get involved. I can see my friends with kids taking these for classroom snacks - you can even skip the added sugar by just cutting the apples into fun shapes.

I used Autumn Glory apples for this recipe because frankly, they're my favorite. These apples have the absolute best flavors with hints of cinnamon and caramel which perfectly compliment the chocolate and white chocolate. They're crisp, sweet, and never mealy. They're especially handy for healthy apple donuts because they're firm enough to hold the shape and the weight of the chocolate and candies. I just love them! 


Want to make healthy apple doughnnuts of your own just in time for Valentine's Day? Here's how you do it:

Healthy Apple "Doughnuts"

You will need:
- 1 Autumn Glory apple
- melting chocolate chips (I used semi-sweet and white) 

To prepare:

Begin by slicing your apple into 1/4 thick slices. I got about 6 slices out of my apple, but only used the largest 4. 

Next, take an appropriately sized cookie cutter and press it into one of your slices. Find the smallest heart-shaped cookie cutter in the set, and use it to cut the core. 

Pat dry. 

Melt your chocolate in the microwave being careful not to burn it. I like to melt mine in 30 second intervals, stirring vigorously each time. 

Drizzle your chocolate over your heart shapes and sprinkle with festive candles and sprinkles.

Place in the freezer for 5 minutes. 

Allow to sit at room temperature for a minute or two.

Enjoy! 

This post was sponsored by Autumn Glory Apples. All opinions are my own!

SHARE VIA
PINTEREST

08 January 2018

Current Favorite Healthy Recipes

Raise your hand if you're on the New Year's Resolutions bandwagon! ::raises hand, too:: 

I'm unashamed to admit that we've embraced the new year around these parts and have jumped head first into healthier habits. I've been sharing a few of our recipes and my goals on IG stories, but I wanted to share some of my favorite recipes over here. 

I don't know about you guys, but after a few weeks of healthy eating, I feel like I get into a recipe rut. Without fail, I'll spend a few hours on Pinterest going through the same recipes over and over again until I finally just throw my hands up. Instead of tossing in the towel, this year, I'm trying to be a little more creative with where I'm getting my recipes. From Instagram to magazines, here are a few of my favorites all in one place, and if you need even more inspiration, this post from last year has other great ideas! 

Breakfast:


We tried this Shakshuka last week, and it. is. phenomenal, and I've been dreaming of it ever since. Shakshuka is typically served with a hearty thick bread, but I didn't miss it at all. In the future I might try it with polenta or grits to give it a little more of a base, but this recipe is next to perfect. 


If you've never made or had a frittata, it's best explained as a quiche without the crust. Healthy muhc? You bet! Upon realizing we purchased a few of the wrong ingredients for this one, we made a few modifications and it turned out fabulous, so I can only imagine how good the OG is. We subbed the chilis for fire roasted tomatoes, and I love how the tomatoes add both color and texture to the inside of the frittata. 

Snack:


Hunter is our Smoothie Maker, and all of his concoctions are so good. He usually follows a recipe by Simple Green Smoothies, and it's a rare day that it's not completely yummy. We use spinach for ours because spinach blends better, and we can use it again for salads later in the week. This recipe includes some of our favorite ingredients like pineapple for sweetness and oranges for zippiness. 

Lunch:


One of my BFF's, Lauren, has an awesome Weight Watchers Instagram account where she shares her easy, quick recipes. I've been making her Buffalo Baked Sweet Potatoes for lunch, and they've been awesome, especially with the extreme cold temperatures. I subbed chicken for ground turkey here! 

P.S. Here's the recipe for Ranch Lauren suggests: No Crumbs Left's Ranch


Admittedly, I am not a huge salad eater unless it's drenched in Ranch or Cesar. However, this salad was super yummy and filling. One of the things that I really enjoyed about it was the additions of the strawberries. Strawberry season is about to be in full force, so put this in your back pocket! 

Dinner:


We put ours on a bed of arugula and top it with Sir Kensington's Special Sauce. Don't skip the "fried" parsnips. Holy yum. 

Dessert:


I've been making energy bites for years. These are delicious and packed with fun flavors. It's the best way for me to get a little treat and still feel like I'm able to indulge my sweet tooth. 

SHARE VIA
PINTEREST

13 December 2017

Christmas Home Tour Part II

As promised, here are the remaining parts of our home that I spruced-up for the holidays. Today we're touring our second floor which means you'll get a peek at a few rooms not yet seen! You can see the downstairs from earlier this week. 


One of my goals is to have a little holiday something in every room - even the bathrooms! I have a few holiday tea towels, and I've layered them over fluffier versions in the bathroom for a little festive fun there. This is a Jack-and-Jill bathroom, so there's another tea towel opposite of this one which means you can get a glimpse from each door as you enter. Cute cute. 


This is one of our three guest rooms and happens to be the most finished. I added a sweet hand-hooked pillow from World Market to the bed along with a series of bottle brush trees from Homegoods that I had left over from a photoshoot from a few years ago. Even that tiny bit of holiday decor transforms the room! 


Finally, the festivities continue in our master bedroom. I grew up with a tree with colored lights, so I always wanted to have two trees: one with colored lights and one with white lights. This tree in our bedroom has all of the ornaments I've collected from swaps, students, and travels over the years. I especially love the one of our first married Christmas card. 


I also have a few little vignettes set-up. How sweet is this Santa? I saw him at Target and had to have him. The little piece of artwork of the Holy Family by Kendall Kirk Singleton rounds-out the decor. 

Thanks for hopping over to see our holiday home! 

SHARE VIA
PINTEREST

11 December 2017

Christmas Home Tour Part I


I just love this time of year, don't y'all? This year is perhaps a little more exciting for me than previous years because it's the first year in our house for the holidays since we renovated. Not only does that mean we're working with different room layouts and color schemes, but we're also working with some new places to set-up our decor. It has been super fun but not without a few challenges. 

In fact, we kicked off the season back in October when we bought our faux tree from Home Depot. During our renovation, we tossed our other trees (yes, I have multiple), so I wanted to be on top of things. I insisted that we grab it before they all sold out. Last week when we went to put it up, we discovered that it was enormous...as in, it took up our entire dining room. I was not only disappointed but concerned because the tree selection goes downhill fast. Thankfully, I was able to find a suitable replacement, for $100 less that I might like 100x better. Win win! 

Of course, I've added a few new items - mostly tree decor like navy striped ribbon & faux magnolias (which are a little trick... ;) - but I've also just enjoyed using what we already have in a new way. In today's post, you'll get a peek at our holiday decor, but you'll also get to see a few of the other rooms in the house that I've almost completed. There's a pinch of Christmas in just about every space, and I hope the tour helps you get a better idea of the house in general. Enjoy!


Confession: my living room/dining room is far from done. We're missing an additional rug under the dining table (eventually going for a layered look!). We definitely need some art above the dining room tables. I have about 8 pillows picked out for our sectional that I haven't had the funds to buy yet. But, I love how FULL the room looks right now. 

I went with a navy, white, red, silver, and gold theme this year. Mostly because that's what I had. Both garlands are from Frontgate, and the one over the mantle is battery operated on a timer, so I never have to turn it off or on. Brilliant. 


My mom and grandmother started a Department 56 Dickens Christmas Village for me when I was in college, and then my MIL generously gifted me a few more pieces a few years ago. I was an English major in college, and A Christmas Carol is one of my all-time favorite stories. This village is a little homage to my love for reading. I hope to keep expanding it over the years starting with pieces directly related to the story. 

Also seen in the living room is my Fontanini nativity set, my wedding gift from my grandmother. I have a special affinity for nativities, and I am hoping to start a collection of those as well. You'll see my second nativity later in the tour. 


The dining room is next. I have big plans for my dining room table, but since I work there every day (long story), I have to keep it functional. The mercury glass trees are from Target many years ago, and I sprinkled in a few votives and some scraps that fell off of our Christmas card garland. 

For our Christmas cards this year, I hung garland around the door to our kitchen. As we get a card, I'm punching it with a hole and tying it to the garland with navy blue satin ribbon. I'll keep the ribbon to reuse next year and get new fresh garland. I'm pretty proud of myself. 


The bar cart gets festive, too...because where else in your home is more worthy than some Christmas spirit than the bar?! The red Santa wine glasses were a gift from an annual Christmas swap from my friends from teaching. We do it every year, and I'm so glad I snagged these a few years ago! I also have a pretty dish from Vietri from my MIL along with some cute cocktail napkins and a felt tree. 

Since this is getting a little long-winded, I'm going to break the tour in half. Come back later to see the upstairs! 


SHARE VIA
PINTEREST

08 December 2017

Christmas Comfort Food: Garlic Cheese & Sweet Tea


Growing up, my dad had this rule: we didn't travel for Christmas. Everyone, every year, was welcome at our house which often meant we had a tiny house filled to the brim with people - mostly, my immediate family of five and my grandparents, my Nana & PopPop. They would either come a few days before Christmas or Christmas day and bring loads of gifts and a cooler full of annual Christmas treats. 

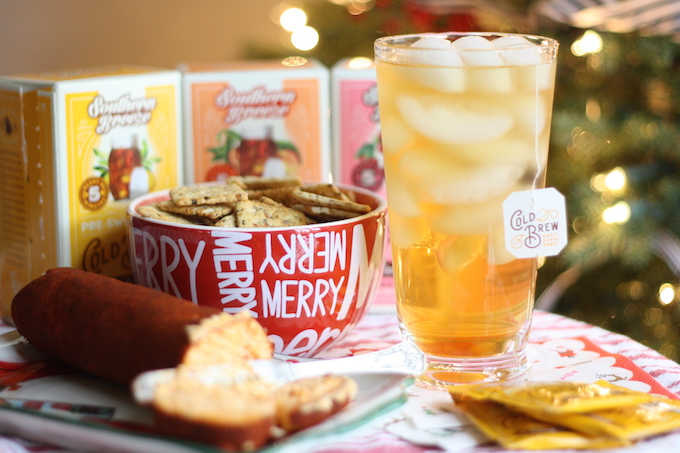
Nana always made a few things: chocolate candy with marshmallows (which I never loved...shhhhh...don't tell anyone), homemade spicy snack mix, and my favorite: garlic cheese. We would immediately dig into the cheese with any crackers we happened to have on hand and of course, pour a tall glass of sweet tea on the side. Eventually, Christmas became synonymous with garlic cheese. 


My Nana passed away earlier this year, and this will be our first Christmas officially sans garlic cheese. So, I set out to try the recipe for myself. I had worked it up in my head as though it was going to be this crazy involved recipe that I'd never be able to accomplish. Well, it turns out that it's not complicated at all. I'm not sure I've mastered her flavor profiles - you know how grandmother's are "just a pinch of this or that" without any exact measuring. Ironically, I cook the same way, so I can't complain too much.  

This garlic cheese is perfect to have on hand in your fridge, especially in the coming days and weeks leading up to Christmas. I like to keep snacks like this on hand for any unexpected guests. I also make sure to have a variety of beverages on hand, too. One of the best beverages I've discovered is Southern Breeze's Cold Brew Tea


They're perfect because in just under 5 minutes, you can have freshly brewed sweet tea without the hassle of boiling any water. You simply steep a single serve, zero calorie (!!!) tea bag in cold water and let it sit for a few minutes. While you're waiting for the tea, you can assemble a festive platter of the garlic cheese and a bowl everything crackers for a quick visit with friends or family who pop-by. 

I wanted to share the recipe for garlic cheese with you today. It really is so simple, and I hope you give it a try! Happy holidays and happy snacking!

Garlic Cheese Log
makes 2 logs

You will need:
- 1 lb sharp cheddar
- 1 block of cream cheese, softened
- 2 cloves of garlic, minced 
- 2 tsp red pepper
- black pepper to taste
- paprika 

To prepare:

1. Set-out cream cheese to soften. 

2. Shred block of sharp cheddar using a food processor and cheese grater attachment. If you don't have a food processor, you can grate by hand. 

3. Once cheese is grated, remove cheese and set aside. Swap your attachments in your food processor back to the regular blade. 

4. Add half of the cheese back to food processor. Add half of the block of cream cheese and pulse. 

5. Repeat step 4, leaving original mixture in processor. 

6. Add garlic, red pepper, and pepper.  Pulse one final time. 

7. Remove cheese mixture and shape into 2 equal sized logs. 

8. Pour paprika on a plate (or other flat surface) and roll logs in paprika until covered completely. 

9. Wrap cheese in parchment or saran-wrap and refrigerate. 

Note: Get creative with your roll - you can roll in pecans or even curry powder!

Enjoy! 

This post is sponsored by Southern Breeze Sweet Tea. All opinions are my own.


SHARE VIA
PINTEREST

17 November 2017

Caramel Apples Two Ways: Caramel Apple Snack Plate with Autumn Glory Apples


Let's be real: is there anything more delightful in the fall than a caramel apple? In my humble opinion, there simply isn't. However, while caramel apples are super fun to make and quite delicious, too, prep and clean-up can be a sticky mess. Between melting the caramel just right, finding suitable sticks, and buffing the apples so the caramel sticks, you never quite know if the path to fall's favorite treat is going to take a few minutes or several hours. 

Case in point: when I set-out to develop caramel apple "cake-pops." I had a brilliant idea of making miniature caramel apples, and I got to work scooping tiny balls out of my Autumn Glory apples with a melon baller. These were going to be EPIC...and as I dipped the tiny little balls into caramel, my recipe dreams crumbled to the ground: the caramel slipped right off into a sticky puddle. Not exactly what I had imagined. And so, I improvised.


The idea behind the cakepops was to create something healthy yet fun. With my caramel apple topping bar already prepared - a little midweek treat to myself - I turned lemons into lemonade. I melted some caramel soft candies, added a little sea salt, sliced up a delicious, sweet cinnamon-flavored apple and enjoyed a caramel apple snack plate. Here's what I included on mine:

- Crushed pretzel sticks
- Candy-covered miniature chocolate candies
- Caramel with sea salt

The possibilities with this are endless. I love the idea of doing this cheese plate style with tons of toppings for a "healthier"girls night. Think things like shredded coconut, crushed toasted pecans, miniature chocolate chips, sprinkles, and even melted fondue cheese.


Get kids involved, too! They'll love watching the oozy caramel capture tiny toppings before their eyes.

I mentioned today's post would have caramel apples two ways: come back next week for steamy baked caramel apples; the perfect end to a fall dinner party. 

SHARE VIA
PINTEREST

25 October 2017

Building a Sinister Charcuterie


Wow. I am overwhelmed by the response to Monday's post. It is my most-visited post of the whole year! Thank you to those who read and commented on social media. Whether or not you agree, I appreciate it. 

And now, back to more palatable topics! 

If you're gearing up for this weekend's festivities, add this sinister charcuterie to your weekend plans. My friends and I love cheese plates. They make an appearance at every gathering that we have, and thanks to lots of practice, our platters have gone from basic to over-the-top. In the best way possible.


With Halloween in less than a week (!!!), I couldn't miss the chance to play-up the holiday with a spooky charcuterie. Everything from the slate platter to the bone-esque utensils, and from the fig jam to the pickled okra is from World Market. I've linked everything for you below. 

Get the scoop on selecting the best cheeses, the meats, and the other accruements over on Annette Joseph Style. I'm spilling how I selected everything, and sharing one of her go-to posts about how to build an unforgettable charcuterie. Don't miss it! 


SHARE VIA
PINTEREST

31 July 2017

Flower Arranging 101


Over the past few years, I've become one of those people who likes to have flowers somewhere in the house at all times. I love the punch of color flowers provide, and I love having a little natural element in a room or two around the house. At my house, you'll usually find flowers on my dining room table, on my built-ins in the living room, and in the two upstairs bathrooms. Love flowers in a bathroom, y'all. 

I used to be the person who would pick up a mixed bouquet at Publix, cut the stems down, plop the whole thing in a vase and call it a day. However, a few years ago I took at floral arranging class with Lindsay, and it really opened my eyes to flower arranging as a whole. Then, two weeks ago, I took another class with C Wayman Designs in Auburn, and it's like my basic knowledge exploded. 

Truly, there are so many things to consider when arranging flowers, and I am definitely not an expert, but I thought I'd share a few of the tips that I've learned over the years to help you with your own home arrangements. Enjoy! 

Lay all of your flowers out in groups. Like a good wine, your flowers need to breathe. Take them out of the packaging, gently separate the stems, and lay like among like. If you're arranging immediately, you don't have to keep them in water, but if you're arranging later, make sure they have plenty to drink. 

Remove the leaves. I know you love the leaves, and I know you've been told that leaves help give plants water. But here's the deal: the flowers are already dead, so if you remove the leaves, you're not hurting them. In fact, you're actually allowing the water to flow up the stem to the buds/petals instead of getting lost in the leaves. 


Ditch the ugly. If you do opt for a premade bouquet (nothing wrong with that!), ditch the flowers that are broken or are obviously filler flowers. This applies especially to excess greenery. Keep the flowers that not only look the best (no brown petals or stems) but that seem to fit in your color scheme.

Arrange in your hand. This is a tip I picked up from Catherine at the workshop a few weeks ago. Arranging in your hand allows the flowers to form a natural circular bouquet. Basically, hold out your palm, and place the first stem in your hand, held by your thumb. Next, place the next stem at an angle across the first stem. Rinse and repeat. 

Tie your bouquet. My life changed when I realized the secret to keeping my flowers sturdy in a rose vase (or any other clear vase) was tying them together. For best results, use floral wire. Amazingly, you don't even notice it! 

SHARE VIA
PINTEREST

31 May 2017

Favorite Cookout Recipes

On Memorial Day, we decided to have an impromptu just-us BBQ. Hunter usually handles the meat, but I tackle all of the sides. A while ago, I would simply gather all of the premade sides I could find at Publix, but now I like to make them all myself because y'all...side dishes are so easy. Over the years I've developed a rock-solid list of go-to summer side dish recipes. These are recipes that I've tried myself and prepare time and time again. If you need a side dish this summer, you won't regret taking one of these to your party! 


(life changing- trust me!)


(I use Zoe's Pimento Cheese for this because it holds together better!)


SHARE VIA
PINTEREST
Related Posts Plugin for WordPress, Blogger...

DESIGN + DEVELOPMENT BY LET IT BE BEAUTIFUL