Probably Polka Dots holiday bar cart | Probably Polka Dots
Showing posts with label holiday bar cart. Show all posts

11 December 2017

Christmas Home Tour Part I


I just love this time of year, don't y'all? This year is perhaps a little more exciting for me than previous years because it's the first year in our house for the holidays since we renovated. Not only does that mean we're working with different room layouts and color schemes, but we're also working with some new places to set-up our decor. It has been super fun but not without a few challenges. 

In fact, we kicked off the season back in October when we bought our faux tree from Home Depot. During our renovation, we tossed our other trees (yes, I have multiple), so I wanted to be on top of things. I insisted that we grab it before they all sold out. Last week when we went to put it up, we discovered that it was enormous...as in, it took up our entire dining room. I was not only disappointed but concerned because the tree selection goes downhill fast. Thankfully, I was able to find a suitable replacement, for $100 less that I might like 100x better. Win win! 

Of course, I've added a few new items - mostly tree decor like navy striped ribbon & faux magnolias (which are a little trick... ;) - but I've also just enjoyed using what we already have in a new way. In today's post, you'll get a peek at our holiday decor, but you'll also get to see a few of the other rooms in the house that I've almost completed. There's a pinch of Christmas in just about every space, and I hope the tour helps you get a better idea of the house in general. Enjoy!


Confession: my living room/dining room is far from done. We're missing an additional rug under the dining table (eventually going for a layered look!). We definitely need some art above the dining room tables. I have about 8 pillows picked out for our sectional that I haven't had the funds to buy yet. But, I love how FULL the room looks right now. 

I went with a navy, white, red, silver, and gold theme this year. Mostly because that's what I had. Both garlands are from Frontgate, and the one over the mantle is battery operated on a timer, so I never have to turn it off or on. Brilliant. 


My mom and grandmother started a Department 56 Dickens Christmas Village for me when I was in college, and then my MIL generously gifted me a few more pieces a few years ago. I was an English major in college, and A Christmas Carol is one of my all-time favorite stories. This village is a little homage to my love for reading. I hope to keep expanding it over the years starting with pieces directly related to the story. 

Also seen in the living room is my Fontanini nativity set, my wedding gift from my grandmother. I have a special affinity for nativities, and I am hoping to start a collection of those as well. You'll see my second nativity later in the tour. 


The dining room is next. I have big plans for my dining room table, but since I work there every day (long story), I have to keep it functional. The mercury glass trees are from Target many years ago, and I sprinkled in a few votives and some scraps that fell off of our Christmas card garland. 

For our Christmas cards this year, I hung garland around the door to our kitchen. As we get a card, I'm punching it with a hole and tying it to the garland with navy blue satin ribbon. I'll keep the ribbon to reuse next year and get new fresh garland. I'm pretty proud of myself. 


The bar cart gets festive, too...because where else in your home is more worthy than some Christmas spirit than the bar?! The red Santa wine glasses were a gift from an annual Christmas swap from my friends from teaching. We do it every year, and I'm so glad I snagged these a few years ago! I also have a pretty dish from Vietri from my MIL along with some cute cocktail napkins and a felt tree. 

Since this is getting a little long-winded, I'm going to break the tour in half. Come back later to see the upstairs! 


SHARE VIA
PINTEREST

21 December 2016

Cherry Bourbon Sweet Tea Floats


With Christmas this weekend (!!!!), I wanted to take my annual blog break with a little holiday treat perfect for your Christmas or New Years Eve parties: Cherry Bourbon Sweet Tea Floats. Want the scoop on this boozy treat? I'm so glad you asked. 

I have to admit it: I am usually not a bourbon/whiskey drinker, but we always have it in the house because my husband loves Manhattans. I'm also regularly jealous of the gourmet cherries he gets in his cocktails when we go out to dinner. When I was dreaming-up the perfect Southern cocktail for the week's festivities, I immediately thought of combining the South's best elixirs: bourbon and sweet tea. 


This cocktail calls for my favorite sweet tea, Southern Breeze Sweet Tea, whatever bourbon (or whiskey) you have on hand, and a few scoops of cherry vanilla ice cream. Put these cocktails in fun mason jars or pretty them up in your favorite cocktail glasses. Don't forget to add a sparkly drink stirrer and give your guests a straw, too. These are a little too thick to sip strawless. 

What I love about this cocktail is that it's perfect for all tastebuds, and you can easily leave out the bourbon for kids or other non-drinkers. Like I say, a family that sips together, stays together. Have an absolutely wonderful Christmas and New Years! I'll see you in 2017! Cheers!  

Cherry Bourbon Sweet Tea Floats
serves 1

You will need:

- 3 scoops cherry vanilla ice cream, softened (I used Haagen Dazs) 
- .75 oz of bourbon (use a full shot for someone who likes a stiff drink)
- 4 oz Southern Breeze Sweet Tea, original

Directions:

Add three scoops of cherry vanilla ice cream to an empty mason jar. Add bourbon and top with sweet tea. Serve with a festive drink stirrer and a straw. Enjoy! 


This post is sponsored by Southern Breeze Sweet tea. All opinions & recipes are my own. 


SHARE VIA
PINTEREST

09 November 2015

Hot Cocoa Bar Cart with Hallmark

Ever since adding a bar cart to my home office, I've been dreaming up ways to style it for different occasions. Of course, styling it for the holidays is tops on my list. Today, I'm sharing with you how I styled a holiday hot cocoa bar cart. I am absolutely over the moon to share this post with you. The concept is something I've been dreaming up for a while, and to be able to put it into a post for you with a company like Hallmark is a dream.


Hallmark is well-known for their fabulous selection of greeting cards, but have you ever noticed their equally amazing selection of decor? This holiday season, holiday decor at Hallmark is not to be missed! You can do so much with it that the possibilities are truly endless. 

Last week, I dipped into my local Hallmark store to take a peek around their selection. I had styling a hot cocoa bar cart in mind, so I went into the store with focus and purpose...but I couldn't help but get whisked away by holiday items at every turn. I was especially smitten with their Enchanted signs and could definitely see them in my home. However, I was a lady on a mission with bar carts on the mind.


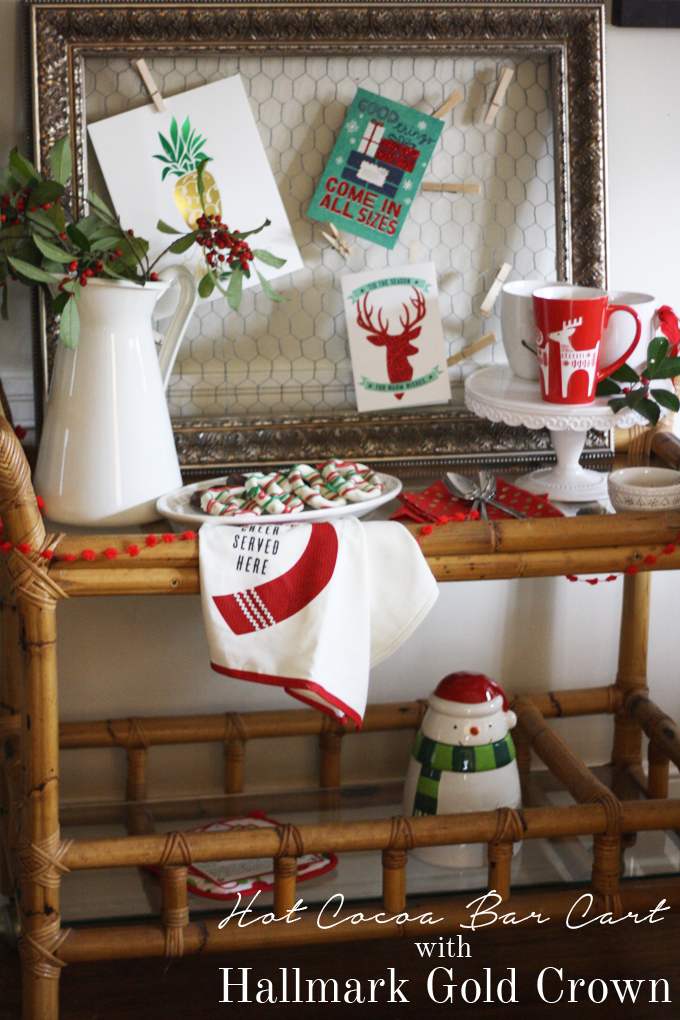
I scooped up an adorable etched mug, a tea towel, pom pom ribbon, a few cards, and some delicious Crafters and Co chocolate covered pretzels. I knew this would make a great start to my hot cocoa bar cart. When I got to the register, I found out that Hallmark was celebrating their Holiday Open House (now until November 15th while supplies last) which meant that my loot more than doubled! I walked out of Hallmark with a chips and dip platter, a beautiful porcelain gift tag, a cookie jar, recipe cards, an ornament, a pot holder, & a reusable tote bag...FOR FREE! Say what?! And, I only spent $50. To say I was excited would be an understatement. 


When I arrived home, I couldn't wait to put everything together. Watch my YouTube video below for a quick tour of how to put your own hot cocoa bar cart together, or read on for full details. 


What You Need to Style a Holiday Hot Cocoa Bar Cart:


I used the pom pom ribbon to add a little holiday pizzazz to my cart. The punchy red gave the cart just the pop I was looking for. Next I layered on all of my Hallmark goodies. From the pretzels to the mug, everything had its place. Need a spot to display all of those holiday cards that will be coming in the mail? Why not pin them over your hot cocoa cart? I placed mine on this DIY chicken wire frame using wooden clothespins. Achieve the same look by adding some garland or ribbon above your cart creating a clothesline of Christmas cards. It's a cute and easy look, not to mention a fabulous storage solution!


I'm so excited to have friends and family over this holiday season. We can use our coffee maker to make warm water quickly then they can use all of my Hallmark holiday treasures to prepare a steaming cup of hot cocoa.


SHARE VIA
PINTEREST
Related Posts Plugin for WordPress, Blogger...

DESIGN + DEVELOPMENT BY LET IT BE BEAUTIFUL